The Relay Add-On Board allows you to use Raspberry Pi to control high voltage or high current devices. You can use this board in the area of home automation, robotic and many more.
This board is an integrated and compact solution for adding relays to Raspberry Pi. With the size of a standard HAT board, it plugs directly onto the GPIO pins. It is compatible with all Raspberry Pi models with 40 GPIO pins.
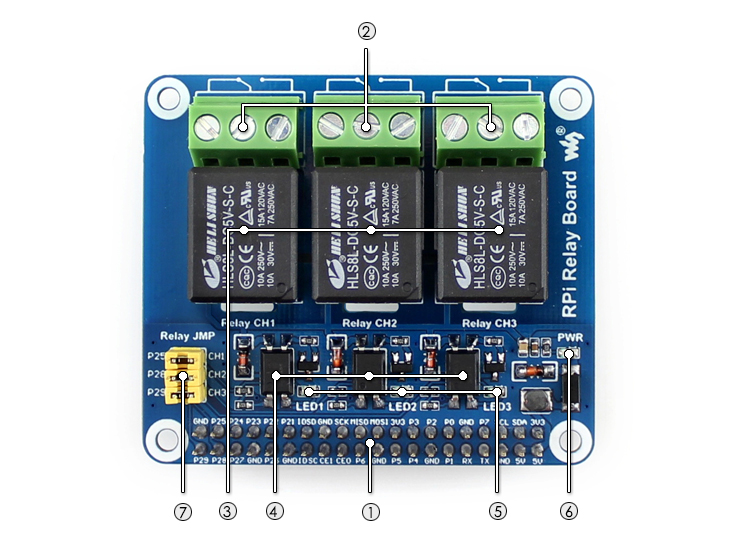
Board layout
Raspberry Pi GPIO interface: for connecting Raspberry Pi
Relay screw terminal: for connecting external devices
Relays
Optocoupler: PC817
Relay LED indicator
LED on: relay NC is opened, NO is closed
LED off: relay NC is closed, NO is opened
Power indicator
Relay control jumper
short the jumper: control the relays by default I/Os used in the example code
open the jumper: control the relays by custom I/Os through jumper wires
On board, there are three 5V relay which can handle loads up to 250 VAC/ 5A or 30 VDC/ 5A. Each relay has a 3-pin screw terminal for connection to external circuit. The pins on the screw terminal corresponds with the standard relay connection namely Normally Open (NO), Common (COM) and Normally Closed (NC) contacts. An optocoupler is used for each relay to isolate and protect your Pi against high current/high voltage.
The relays are connected to the Raspberry Pi GPIO pins as per table below:
Channel No.
RPi Pin No.
wiringPi
BCM
Descriptions
Relay CH1
37
P25
26
Channel 1
Relay CH2
38
P28
20
Channel 2
Relay CH3
40
P29
21
Channel 3
Notice: The labels on the PCB are corresponding to the wiringPi code.
The relay connection to GPIO pins in the table above is when the three jumpers on board are shorted. If you want to make a custom connection to the GPIO pin of your choice, you can do so by removing the jumper and with a jumper wire, connect the relay header (CH1, CH2 or CH3) to the desired GPIO pin.
All relays are active low. It means, to trigger a relay, all you need to do is send or set LOW to the corresponding GPIO pin. When this happen, the NO contact will be connected to COM and NC contact will be disconnected from COM.
Features:
3 changeover 5V relays - switch voltages up to 250 VAC/ 5A or 30 VDC/ 5A
Power indicator LED
Status LED for each relay
Easy to program in Python, Shell, Scratch and C
Custom connection to GPIO pin is possible
Compatible with all Raspberry Pi models with 40 GPIO pins
Compact footprint. Standard HAT size
2x mounting screws, nuts and standoffs are included

